The best way to start grooming at home is to keep it short, calm, and simple: brush a little, check the coat and skin, clean only the easy areas, and stop before your dog gets restless. For beginners, the goal is not a full salon routine. It is to help your dog get used to handling and to notice small changes early. If your dog is suddenly very fearful, painful, or hard to handle, separate safely and contact a veterinarian or qualified behavior professional promptly.

What grooming at home usually includes
At home, most beginners can safely handle a few basic tasks. These are the ones that help you stay ahead of tangles, dirt, and small changes in your dog’s coat:
- Brushing or combing to remove loose hair and keep the coat from matting.
- Checking the skin and coat for knots, flakes, redness, or areas that seem tender.
- Cleaning around the eyes, paws, or face when there is light dirt or debris.
- Getting your dog used to being touched on the ears, feet, tail, and legs.
- Looking over nails, paw pads, and ears so you can decide whether a professional trim or exam is needed.
That list is enough for many household dogs. A short brushing session after a walk, or a quick coat check while your dog is lying near you in the evening, often works better than trying to do everything at once.
How to set up a calm grooming session
A good setup matters more than fancy tools. Dogs usually do better when the routine is predictable, the surface is stable, and the session ends before they feel trapped. If your dog already gets uneasy with handling, make the first session shorter than you think it needs to be and watch the body language closely.
Simple prep checklist
- Pick a quiet time when your dog is already settled, not wound up from visitors or a long play session.
- Choose a non-slip surface, such as a rug, bath mat, or towel on the floor.
- Gather only the tools you need before you start: brush, comb, towel, and a treat or two.
- Keep the first sessions short enough that your dog can succeed.
- Use calm, steady handling rather than holding your dog in place for a long stretch.
If your dog is more relaxed after a walk, try grooming then. If your dog tends to be sleepy in the evening, that may be the better window. The point is to work with your dog’s normal rhythm, not against it.
Beginner-friendly grooming steps
Start with the easiest task and move in a predictable order. A simple routine helps both of you know what comes next.
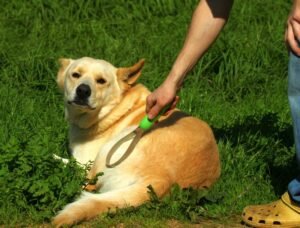
- Let your dog sniff the tool. Hold the brush out and let your dog investigate it before you touch the coat.
- Begin with a few strokes in a comfortable area. Many dogs tolerate the shoulder, back, or chest better than the feet or face.
- Work in short sections. Brush a small patch, pause, and check whether the coat is coming through easily.
- Use your free hand to feel for tangles. A quick finger check can help you find knots before the brush catches them.
- Move to the less-loved areas last. Feet, ears, tail, and belly often need extra patience.
- Finish with a brief reward and a break. Ending while your dog is still doing well teaches that grooming is manageable.
For many dogs, the first few sessions are really practice sessions. You may brush only one side of the body the first day and call that enough. That is normal.
What to do today if you are just starting
- If your dog is calm: do a 3- to 5-minute brush and stop.
- If your dog is curious but unsure: let them sniff the brush, then touch one easy area and end there.
- If your dog pulls away: shorten the session and try again later instead of pushing through.
- If the coat is tangled close to the skin: do not force the brush through it; consider a groomer.
What to watch while you groom
Grooming is useful partly because it gives you a close look at your dog’s body. Watch for both coat changes and behavior changes. A dog that is uncomfortable may not always yelp or struggle. More often, the clues are smaller: turning the head away, stiffening, licking the lips, panting when the room is not hot, shaking, whining, or showing the whites of the eyes. These quick checks matter because they help you notice when a normal grooming task has turned into something your dog finds stressful or sore.
Also pay attention to the coat itself. A beginner can usually spot:
- Knots that keep tightening instead of loosening.
- Areas that look red, flaky, or irritated.
- Skin that seems sore when you touch it lightly.
- Uneven shedding or patches that look different from the rest of the coat.
- Dirty paws, crust around the eyes, or debris stuck in the coat after outdoor time.
These observations do not tell you what is wrong, but they do tell you whether you should slow down, switch tools, or stop for the day.
What to do if your dog resists
Resistance usually means the session is too long, the tool feels strange, the dog is not in the mood, or the dog has learned that grooming predicts discomfort. The answer is usually not to push harder. It is to make the next attempt easier.
Try this before you quit altogether
- Shorten the session. Even one successful minute is better than a long struggle.
- Change the order. Start with the body area your dog tolerates best.
- Use a different tool. A softer brush or wider-toothed comb may feel better on a sensitive coat.
- Pick a better time of day. Some dogs do better after exercise; others do better when they are sleepy.
- Reward cooperation quickly. A small treat after a few calm strokes can help build a better pattern.
- Pause before your dog escalates. End the session while your dog is still able to recover calmly.
If your dog gets tense as soon as the brush appears, spend a few days just pairing the tool with something pleasant. Let the brush sit nearby, give a treat, and put it away. Then try a brief touch later. That slower approach often works better than trying to complete a full grooming routine on day one.
When to stop and get help
Some situations are better handled by a professional groomer or a veterinarian. Stop the session if you run into any of the following:
- Mats close to the skin that do not loosen easily.
- Signs of pain when you touch a certain area.
- Skin problems such as redness, swelling, broken skin, or a strong odor.
- Strong fear or panic that does not improve with shorter, calmer sessions.
- Handling that becomes unsafe because your dog is twisting, snapping, or trying to escape.
Behavior changes matter. If your dog’s reaction is outside their usual pattern, treat it as information rather than stubbornness: slow down, stop the session, and look for pain, fear, skin irritation, or a handling problem that needs professional help.
Do not keep working through a painful mat or a sensitive area just to finish the job. A groomer may be able to handle the coat safely, and a veterinarian can help if the skin looks irritated or the dog seems sore.
Simple beginner checklist
- Choose a quiet time and a non-slip spot.
- Gather a brush, comb, towel, and treats before starting.
- Let your dog sniff the tool first.
- Brush a small area and keep the first session short.
- Watch for lip licking, panting, stiff posture, shaking, or pulling away.
- Stop if you find mats near the skin, sore spots, or strong fear.
- End with praise or a small reward so the next session starts better.
For most beginners, the real goal is not a perfect groom. It is a dog who can tolerate a little handling, a coat that gets checked regularly, and a routine you can repeat without turning the house into a wrestling match.
Final takeaway: Keep home grooming short, gentle, and predictable. Start with brushing and basic coat checks, watch your dog’s body language closely, and stop early if the coat is matted, the skin looks irritated, or the dog is clearly uncomfortable.

- Is It Safe to Keep Dogs at Home? A Practical Safety Guide - June 17, 2026
- Can Dogs Eat Homemade Chicken Noodle Soup? - June 13, 2026
- Why Is My Dog Getting Anxiety? Common Reasons and What to Do Next - June 11, 2026